If your car has started to vibrate more than usual or you’re noticing strange noises every time you accelerate, you’re not alone. I faced the same head-scratching issue with my own vehicle. After digging through advice, tackling repairs myself, and learning from a trusted mechanic, I found out the trouble often starts with something called an engine mount.
In this blog post, I’ll tell you everything you need to know about fixing car engine vibration and noise problems at home in 2025. I’ll explain what engine mounts do, how to spot when they’re failing, and exactly how I replaced them in my car—using regular tools you probably have at home. I’ll also touch on common issues you’ll see in India with automatic cars and even share practical tips if you prefer instructions in Hindi.
Understanding Engine Mounts: Why They Matter
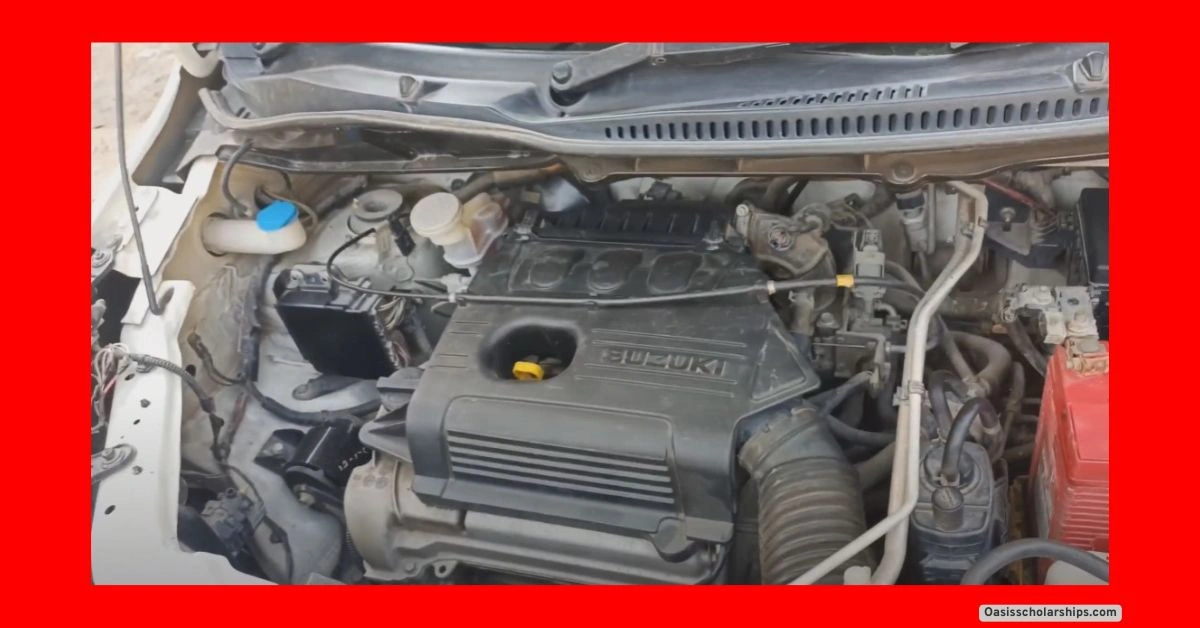
An engine mount is a small but mighty part that keeps the engine fixed to your car’s frame. Most cars have three engine mounts: one on the engine side, one at the back (often hydraulic), and one linked to the suspension. Each mount uses a mix of strong rubber and sturdy metal. This combo soaks up engine vibration and stops noise from spreading into your cabin.
Think of engine mounts as shock absorbers for your engine. They keep all the vibration and rumbling from shaking the whole car. If one mount goes bad, the engine gets restless. The vibration sneaks into every part—dashboard, seats, floor, and steering wheel.
How Do Engine Mounts Affect Vibration?
When engine mounts wear out or crack, they let vibration flow straight into the body. Your relaxing drive can quickly turn into a noisy, shaky mess. You might think, “Why is my engine so loud all of a sudden?” or “Engine sounds loud when accelerating.” Often, these noises signal failing engine mounts.
Bad Engine Mounts: Symptoms and What I Noticed in My Car
When my mounts went bad, the first thing I felt was a rough idle—my car shook every time I stopped at a signal. Over time, it felt like the whole car was buzzing, especially when I pressed the accelerator. For me, these clues pointed to a problem with the engine mounts:
- Stronger Vibration: The seats and steering wheel vibrated more than usual.
- Weird Noises: I heard thuds and clunks, especially at startup or when shifting gears.
- Visible Damage: The rubber in the mount was cracked and even cut through in places.
- Corrosion and Rust: Battery acid had leaked down and rusted the metal brackets.
My Real-Life Example: 100,000 Kilometers, 7 Years Later
My car had done nearly 1 lakh kilometers in 7 years—a typical figure if you drive regularly in India. I noticed the rubber on one mount was cut almost completely, and metal parts were rusty. The result: the engine would shift around, and vibration spread to the entire car. If I’d waited much longer, it could’ve started damaging the suspension and steering column as well.
How I Fixed My Car’s Engine Mounts at Home: A Full Step-by-Step
If you’re ready to tackle this at home, here’s exactly what I did. You don’t need fancy skills—just patience and common tools.
Getting Ready: What You Need Before You Start
Before opening anything, I gathered these:
- Basic socket and spanner set
- Screwdriver
- Jack stands for extra safety
- Black paint (for rust areas)
- New engine mounts for my car make and model
I started by disconnecting the battery and removing it completely. Then, I unbolted the battery tray. This opened up space to see and reach the engine mount. For safety, I also unplugged gear lever wiring close to the area.
Step 1: Removing Old Engine Mounts
I looked for all the bolts holding the mount. In my case, there were six nuts and bolts. I used a wrench to remove them, sometimes giving them a squirt of oil to help. If you see rust, take it slow so you don’t strip the threads.
With the bolts out, I pulled out the old mount. Mine was in bad shape—the rubber inside was cut through, and metal parts were rusty from battery acid leaks.
Step 2: Cleaning and Painting Rusty Parts
Before installing anything new, I cleaned up all rusty spots. I used a wire brush on the brackets and anywhere else that was corroded. I painted clean metal with black rustproof paint. This step is simple, cheap, and will prevent future problems.
I also checked the battery mount bracket and restored it. Trust me, this saves money. If you ignore corroded brackets, you may have to replace the whole thing next time.
Step 3: Fitting the New Engine Mounts
I bought good-quality engine mounts: Maruti DGP and MG were my options, priced at about ₹850 each. I placed the mount in the correct position and tightened each bolt firmly by hand, then double-checked with the wrench.
The key is to match the alignment holes perfectly so the mount fits snugly between the engine and the frame. Once tightened, it felt solid—no wobble, no loose ends.
Types of Mounts:
- Engine Side Mount: First mount, found under the battery tray.
- Suspension Mount: Linked to the car’s suspension and steering.
- Hydraulic (Rear) Mount: At the back of the engine, it takes most of the load.
Step 4: Reassembling Everything
I put the battery tray and battery back. I carefully reconnected all wires and checked that everything was back in place.
Once assembled, I started the engine and listened. Vibrations had dropped to near zero. No more rattling or strange noises. It felt like a new car.
If you’re still reading, maybe you’re searching for how to fix the car engine vibration noise problem at home automatically—the process is about the same, but automatic cars may have slightly tighter spaces.
Deeper Look: Three Engine Mounts and Their Specific Problems
Engine Side Mount
This sits under the battery tray and often gets hit with acid spills and rust. I noticed the metal on mine was thin in places, almost eaten away. Clean it well and paint it before installing a new mount.
Suspension Mount
This one is connected to the suspension and steering. Changing it was the priciest part of the job since it’s more involved. But once it’s done, steering feels far more solid, and you avoid long-term wear on the column.
Rear Hydraulic Mount
That’s the “backbone” at the engine’s rear. It supports the load and absorbs shocks. Mine was totally shot—the rubber had separated. It’s a good call to change all three mounts at once. That way, you don’t have to tear things apart again a few months later.
Tips for Long-Lasting Smooth Rides
Make it a habit to check engine mounts every oil change. Look for cracks, splits, soft spots, and rusted brackets.
Fight Rust
Use rustproof paint any time you spot metal corrosion, especially near the battery. Fix battery acid leaks as soon as you see them.
Replace All at Once
I strongly suggest replacing all three at the same time, especially if your car has gone past 7 years or 100,000 kilometers. You’ll avoid extra labor charges and spare your nerves.
If you’re serious about how to fix the car engine vibration noise problem at home without going back and forth to the shop, stay ahead with these checks.
Reliable Shops and Quality Parts in India
I fixed my mounts at M Suspension House. They restored my old parts by cleaning and repainting, saving me money. A good shop carries a full line of mounts, suspension parts, steering gear, and even axles.
Pick branded mounts like Maruti DGP or MG. Check prices (mine was ₹850 per month) and look for guarantees on labor and parts. Trust goes a long way—find a shop that stands by their work.
What Does Repairing Engine Mounts Cost?
Labor and Time
Changing engine mounts isn’t a quick job. You need to remove different components, including the suspension in some cases. It takes a few hours per month, especially if rust or tight bolts slow you down.
Price Breakdown
- Engine mount: about ₹850
- Paint and rust treatment: minimal, just a small can of paint
- Labor: higher for suspension and rear mount, but saved by replacing all at once
If you plan carefully, you can do this at home for much less than a shop will charge.
Conclusion
Solving engine vibration and noise in your car doesn’t have to be stressful. Whether you’re doing it at home in India or looking for guidance in Hindi, the answer to “How to fix car engine vibration noise problem at home 2025” starts with checking and replacing your engine mounts.