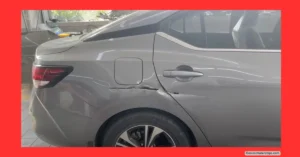
Anyone who drives on busy roads knows that the occasional bumper crack or dent is almost impossible to avoid. Whether it’s a minor fender bender, a tight parking spot, or just a sudden tap in traffic, plastic bumpers take a lot of abuse. While insurance companies often push for full bumper replacements (and hefty bills),
I learned that repairing a cracked bumper is not only possible but also economical and long-lasting. Here, I’m sharing my experience and detailed steps for how to fix a cracked bumper without removing it in 2025, featuring practical tips, tricks, and budget advice.
Why and When Bumper Repair Makes Sense
Bumpers often get damaged in the most mundane moments—nudging a wall, grazing another car, or minor accidents where the rest of the car stays untouched. That visible crack in the plastic might seem small, but it can take away from the car’s look and even reduce the bumper’s strength. Traditionally, many insurance companies and service centers suggest replacing the whole bumper. That may sound secure, but it hurts your wallet and wastes a lot of good plastic.
Common Causes for Bumper Cracks
- Light collisions in traffic or at parking lots
- Touching barriers or curbs
- Drops in temperature that leave plastic more prone to cracking
- Previous repairs done poorly
Why Repair Instead of Replace?
- Saves money: Replacement can cost several times more than fixing.
- Time-saving: Repairs usually take just a few hours. No waiting for parts.
- Restores strength: Modern repair methods can make the bumper nearly as strong as new.
- Keeps the car looking fresh
Key Benefits of Bumper Repair
- Cost-effective compared to replacement
- Fast turnaround
- Good as new: the fix can blend in seamlessly if done right
- Environmental bonus: less plastic waste
Meet the Expert: Inside a Popular Bumper Repair Shop
When my bumper cracked, I visited a well-known local shop run by Manoj Singh in Dwarka. His setup is simple—a compact workshop packed with the tools, know-how, and plenty of steady hands. I noticed several things right off the bat: the tools were tailored for plastic bumper repair, and Manoj had a deep understanding of the repair process.
What Makes a Good Bumper Repair Shop?
- Specialized tools for plastic repair
- Attention to detail for both large cracks and tiny splits
- Experience in working with different car models
The Bumper Repair Process Explained
Let me break down the how-to-repair-plastic-bumper-crack process I witnessed step by step. If you pick up a plastic bumper crack repair kit or cracked broken bumper repair kit, you’ll find many of these components are included.
Step 1: Remove and Inspect the Bumper
- Begin by opening up the bumper. This involves
- Unscrewing fasteners holding it to the car
- Removing the bumper carefully to avoid more cracks
- Inspect all cracks, big and small, including secondary splits near the main damage
Step 2: Prepare the Crack for Repair
- Clean the area around the crack
- File or sand down rough edges
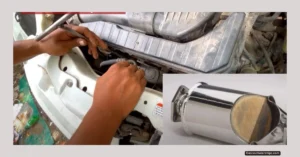
Step 3: The Magic Tool—Hot Air Welders and Plastic Strips
One key to a strong repair is the use of a hot air tool—a device that blows very hot air onto plastic, causing it to soften and melt slightly.
- Process:
- Plug in the hot air welding tool
- Aim it at the cracked area to heat it up
- Once soft, press the area together by hand for a tight bond
Step 4: Fill and Reinforce the Crack
Now, plastic strips (included in most quality bumper repair kits) come into play.
- Place the strip across the crack
- Use hot air to melt the strip so it bonds with the bumper plastic
- Work in layers as needed—for big cracks, reinforce from both sides
Step 5: Smooth and Blend
- Press and shape the repair while it’s warm to match the original bumper curve
- For deeper cracks, build up with more strips and heat
- Let the repair cool and harden
Step 6: Reinstall the Bumper
- Align the bumper to the car’s original position
- Fasten all screws snugly
- Double-check that the fitted bumper lines up well
At a Glance: Bumper Repair Steps
- Remove bumper (optional; many cracks can be fixed with the bumper still on)
- Clean and prep the area
- Use hot air tool to soften plastic
- Press crack together
- Weld with plastic strips
- Shape and smooth
- Cool and reinstall
The Technical Side: Tools and Materials Matter
I want to stress how much difference good equipment makes here. Manoj Singh used a custom-made hot air machine that pumps out steady, high heat. This isn’t just a hair dryer or heat gun—it’s designed for melting plastic safely and evenly.
Why Hot Air Is Critical
- Softens plastic gradually without burning
- Allows precise melting for a strong bond
- Works on both front and back for maximum strength
Using Plastic Strips
Whether you go for an all-in-one bumper repair kit or a pro set, make sure the plastic strips are compatible with your bumper’s material. Not all plastics bond the same way.
How to Fix a Cracked Bumper Without Removing It 2025
Often people look for ways to fix their bumper without taking it off. This method I saw was designed for both on- and off-the-car repairs. The real secret is using accessible tools and being patient with heating and shaping. If you have a moderate crack, you can even skip full bumper removal—just make sure the area is clean and you have space to work.
This means you don’t have to worry about breaking more tabs or dealing with extra labor charges. The process works like this:
- Locate the crack
- Sand and clean around the split
- Use hot air or a plastic welding gun directly on the car
- Apply the strip and melt it in place
- Sand, blend, and touch up the surface
For those searching for how to fix a cracked bumper without removing it in 2025 or cracked bumper repair near me, this method can make all the difference.
After Repair: Reinstallation and Color Matching
The repair is almost done, but there’s one thing that matters a lot—how the bumper looks. When repairs use black plastic strips, there might be a visible patch. But don’t worry—you can easily fix the look using a simple home solution.
Fitting the Bumper Back
- Use the same screws and clips you took out at the start
- Make sure the bumper sits flush and lines up
Blending the Color: The Nail Polish Trick
Paint matching is expensive and time-consuming. Here’s an easy hack I picked up:
- Nail polish: Find a nail polish shade that matches your bumper (mine was white)
- Carefully apply it to the repaired area
- Let it dry and build up if needed
This quick touch-up hides the black plastic, keeping the repair almost invisible from a distance. For many, nail polish is easier to get and cheaper than touch-up paint.
Nail Polish vs. Touch-Up Paint: Pros and Cons
| Feature | Nail Polish | Touchup Paint |
|---|---|---|
| Price | Low | Higher |
| Availability | Almost anywhere | Sometimes hard to find |
| Application | Easy brush | Often trickier |
| Color Choice | Many options | Limited, brand-based |
Final Look and Experience
Once the bumper was reinstalled and the nail polish dried, the repair became nearly invisible. If I hadn’t pointed it out, most people wouldn’t notice anything. Up close, there’s a tiny bit of texture, but from a normal distance it’s undetectable. The real win was that the area felt just as strong as the original—if not stronger.
My Observations
- Repair strength rivals a factory bumper
- The nail polish trick works well for matching color
- The repaired area hides easily with the right touch-up and mud flap
Budget Breakdown: What Does Bumper Repair Cost?
One of the best things about this DIY method is how much money you save compared to a full replacement.
- Plastic bumper crack repair kit: Affordable, especially compared to full bumper parts
- Hot air welding tool: Most shops have them, or you can buy/rent one for little money
- Nail polish for paint match: Extremely cheap, easy to keep for later touch-ups
Cracked Bumper Repair Cost vs Replacement
| Repair Option | Average Cost (INR) | Comments |
|---|---|---|
| DIY bumper repair kit | 250–800 | Includes strips & tools |
| Professional shop repair | 800–2000 | Fast and reliable |
| Full bumper replacement | 4000–12000+ | Factory part + labor |
Even if you pay a pro, you’re way ahead on time and money.
Where Do You Save?
- Labor: No complicated removal/installation needed if working on-car
- Parts: Only repair materials—not a whole new bumper
- Time: Most repairs done in a morning or afternoon
After seeing all this, anyone looking for plastic bumper repair cost or cracked bumper repair cost will find this method an eye-opener.
Key Takeaways: Quick Guide to Bumper Crack Repair
- You can repair most cracks in plastic bumpers whether or not you remove them
- How to fix a cracked bumper without removing it 2025: Use hot air tools, plastic strips, and a steady hand
- Nail polish offers a fast, cheap alternative to touch-up auto paint
- DIY, pro shop, or a mix—repairs save time and money and keep your car looking sharp
- Always check that your repair kit matches your bumper’s material
Conclusion
If your car’s bumper gets cracked, don’t rush to the dealer or shell out for a new one. Fixing a plastic bumper crack at home or through a local expert is easier, quicker, and lighter on your wallet than you think. With a cracked, broken bumper repair kit and a little patience, you can get professional results.