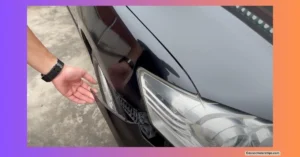
Anyone who drives in busy city areas knows the headache that comes with a cracked or dented car bumper. Whether you’re parked too close to a bike or stuck in unpredictable traffic, a damaged bumper seems almost inevitable. The good news? You don’t need to visit a body shop or spend a fortune on repairs. I’ll show you exactly how to fix a cracked bumper without removing it, using a simple plastic bumper crack repair kit and basic tools you might already have at home.
This guide covers everything you need to know about car bumper crack repair at home, tips for using a bumper repair kit, what to do if your car bumper is falling off, and why DIY could be your best choice. I’ll walk you through the same practical process I use, proven to deliver impressive results even if you’ve never tried a car repair before.
Why Repairing Your Bumper at Home Makes Sense
Bumper damage often happens at the worst time. A small crash in traffic or a tap from a bike’s leg guard can easily lead to a visible crack or a nasty dent. In places like Delhi, where the streets stay crowded, small accidents are common. Most car owners face this at some point.
Common Causes of Bumper Damage
- Collision in busy parking lots
- Low-speed impacts with bikes or other vehicles
- Bumping into curbs or driveways
- Age-related plastic fatigue
You might think a cracked bumper means an expensive visit to the workshop. But repairing your plastic bumper crack at home has real benefits:
- You save money by skipping the mechanic.
- Repairs are possible any time, without waiting for appointments.
- It feels great to solve such problems on your own.
If you want to know how to repair a bumper without removing it from a 2025 car or how to fix a car bumper falling off, read on. The process is easy to follow and works on most cars.
The Tools and Materials You’ll Need
Having the right tools makes the job smoother and more effective. For a standard car bumper repair at home, here’s what I use:
Basic Tools:
- Screwdrivers: Usually two screws for the rear lights and four for the bumper. Phillips and flathead should handle most cases.
- Multi-purpose bolt tool: Helpful for stubborn or hidden screws. I found a fantastic multi-purpose bolt tool in the video description that can open almost any bolt.
- Heat gun or hair dryer: Perfect for softening the plastic around dents. Either works, but the heat gun acts faster.
- Soldering iron/machine: For melting plastic along cracks. Essential for plastic bumper welding.
- Plastic mesh, grill, or jali: Reinforces the inside of the crack so it stays strong over time.
- Cable ties: Give extra strength at the points of repair.
- Protective gloves and safety glasses: always smart when working with heat.
Optional Supplies:
- Touch-up paint: Restore your bumper’s look after repair. White touch-up paint is widely available and easy to match.
- Sandpaper: For smoothing out the fixed area before painting.
Almost all these items are part of a basic plastic bumper crack repair kit, or you can find them easily at any hardware store.
Step-by-Step: Prepping the Bumper for Repair
A good repair job starts with careful prep. Even if you want to know how to fix a cracked bumper without removing it, it helps to open up the damaged area so you can work easily. Most car bumpers can be partially loosened without full removal.
1. Remove Rear Lights and Screws
- Locate the light screws: most cars use two screws per side for the rear lights. Remove these with your screwdriver.
- Remove bumper screws: The bumper itself is held on with four screws, often visible along the top and bottom. Use the screwdriver or multi-purpose bolt tool here.
- Disconnect fog light wires: Carefully unplug the fog light or reverse sensor wiring before pulling the bumper away.
2. Detach the Bumper Partially
- Loosen the clips at the bumper’s edges. These may pop free with a bit of gentle pressure.
- Don’t yank the bumper. Apply steady, even pull to avoid making the crack worse.
- If you only need to work on one section, you might not need to remove the whole bumper.
Tips:
- Keep all screws somewhere safe.
- Take pictures before you start for easy reassembly.
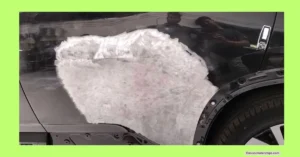
Repairing Dents with Heat and Pressure
One of the biggest complaints with bumpers is a deep dent, often as ugly as a crack. The process of removing dents uses a combination of heat and steady pressure.
How to Do It
- Warm up the plastic: Use a heat gun or hair dryer to focus heat on the dented area. Keep the gun moving to avoid overheating.
- Once the bumper feels pliable, push the dent out. Use your hands, or gently apply pressure with your knee or foot if needed (wear shoes, and protect the surface so you don’t scratch it).
- While holding the dent outward, cool the spot with a wet towel or some water. This helps the plastic set in its new shape.
- Repeat as needed until the dent is nearly invisible.
Before-and-after difference: After following this process, that sagging or crumpled bumper can look nearly as good as new, even before painting.
Fixing Cracks: Plastic Welding Made Simple
Here’s where things get interesting. Modern car bumpers are designed to bend, not break, but a strong impact can still crack them. Luckily, plastic welding can repair these cracks right at home.
Melting and Fusing the Crack
- Let your soldering iron warm up fully.
- Run the tip along the crack, melting both sides lightly until the gap closes.
- Press the two parts together as the plastic softens and starts to join. Work from the back (inside) first for strength, then move to the outer side.
- Repeat several times if needed, always keeping the plastic hot but not burning.
Reinforcing from the Inside
- Place a strip of plastic mesh or jali along the back of the crack.
- Use the soldering iron to melt the mesh into the plastic, pressing it gently until it sits flush.
- This internal support helps stop the crack from spreading again.
Adding More Strength with Cable Ties
- Place a cable tie over the crack and use the soldering iron to gently melt it into the bumper plastic.
- The cable tie melts quickly and fills any remaining gaps, especially good for wider cracks.
- Add two ties if you think extra support is needed.
- Try to keep the melted tie tidy so it’s not visible from outside.
Key Safety Tips
- Don’t overheat painted areas, or you’ll have more paint to touch up.
- Keep the work area ventilated; melting plastic can make smoke.
- Wear gloves to protect your hands from accidental burns.
- Take your time, and check your work for weak spots by gently flexing the repaired area.
Painting and Reassembling Your Bumper
Once you’ve finished the repair, a neat paint job makes all the difference. Here’s how to get good results with touch-up paint.
Smoothing and Painting
- Lightly sand the repaired area for smoothness if you want a flawless finish.
- Clean away dust and wipe dry.
- Apply touch-up paint in light coats, letting each coat dry for a few minutes.
- Use white touch-up for most easy repairs. For metallic or unique colors, a professional paint job may be better.
- Allow the paint to cure as per can instructions.
Fitting the Bumper Back
- Reconnect any wires first (fog light, sensors, etc.).
- Press the bumper back into position, making sure the clips snap into place.
- Reinsert and tighten all screws.
- Replace the lights and tighten their screws.
- Double-check fit and finish to see if any further adjustment is needed.
Extra Tips and Answers to Common Problems
What if the crack keeps opening?
Try reinforcing it with extra plastic mesh or another cable tie.
How to repair a bumper without removing it from the car at home?
Sometimes, you can do the entire fix by heating and welding the crack from the outside, especially if the spot is easy to reach. Just work carefully to avoid damaging the paint.
How to fix a car bumper falling off?
Check all the clips and screws. If any are broken, you can replace them or use strong adhesive along with reinforcing mesh.
When to go to a pro:
If your bumper crack spans most of its length, or if you have heavily damaged paint, a professional might be best.
How to repair a plastic bumper crack yourself:
The steps I’ve described here, using a soldering iron, mesh, and cable ties, plus a bumper repair kit, will handle most cracks at home.
Is a bumper repair kit worth it?
Absolutely, for small to mid-sized cracks and dents, these kits save time, money, and the hassle of shop visits.
Maintenance tips:
- Check your bumper every few months.
- Clean dirt and grime regularly.
- Fix small cracks quickly to prevent bigger problems.
Conclusion
- You don’t need fancy equipment for car bumper crack repair at home.
- The process works for most vehicles and gives a nearly factory look.
- Heating the plastic makes dent and crack repairs much easier.
- Plastic bumper crack repair kit tools, like a soldering iron, mesh, and ties, can save you a trip to the shop.
- For quick jobs or if you want to know how to repair a bumper without removing it from a 2025 car, give these steps a try.
- Touch-up paint restores the look, especially for standard car colors.